The XL1 Watchdog
|
> top of page < |
The Canon FU-1000 Monochrome CRT Viewfinder for the XL1 / XL1S
a review by Ken Tanaka
Introduction · Mounting · Controls & Adjustments · Calibrating · Comparison to FU-500 Color LCD EVF · Caveats · Summary · Credits
Newcomers to videography and to the XL1S are often surprised to learn that Canon offers a monochrome viewfinder for the XL1 and XL1S. Common reactions tend to be along the lines of, "I thought black and white viewfinders disappeared with VHS camcorders! Why in the world would anyone want a black and white viewfinder when the XL1S comes stocked with a color viewfinder as standard equipment?" When they learn that this accessory carries a list price of $1,999 and a street price around $1,500 (USD), eyes roll and snickers of disbelief pour forth.
But the fact is that high-resolution monochrome viewfinders have been, and continue to be, the standard image-checking tool throughout the broadcast and professional videography field. Although color LCD viewfinder screens have begun appearing on professional cameras they are offered as secondary, and often multifunctional, viewing aids. When professional camera operators put their eyes to a viewfinder cup you can be sure that they’re looking at beautiful black and white.
Why do professionals endure, indeed demand, such apparent sensory deprivation? There are several reasons. The low resolution of LCD viewfinders is simply too coarse to enable accurate fine manual focus adjustments. The low resolution of LCD viewfinders also does not permit viewing of the entire video frame. Resolution aside, however, color displays tend to confound the eye’s contrast judgment and can also lead to focus misjudgment.
Realizing that a B&W viewfinder would be important to the success of the XL1 with professional videographers Canon enlisted the help of Ikegami, the renowned manufacturer of ENG and broadcast cameras and equipment, to develop a B&W viewfinder for the XL1. As a result of that collaboration Canon introduced the FU-1000 viewfinder in the fall of 1999.
The FU-1000 is essentially a Canon-branded stock Ikegami 1.5 inch B&W viewfinder, the cousins of which can be found on most of Ikegami’s shoulder-mounted broadcast cameras.
Mounting the FU-1000
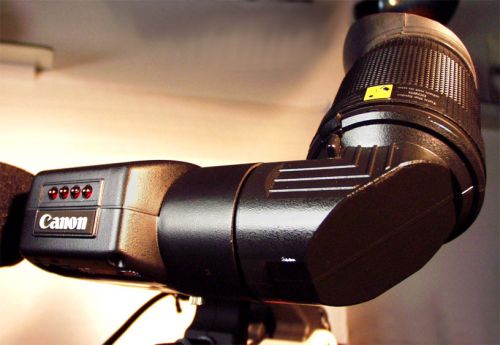
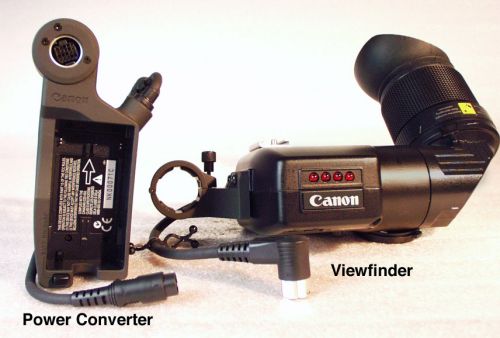
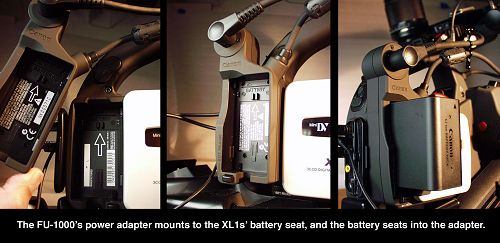
Mounting the FU-1000 viewfinder to the XL1 / XL1S is a two-step maneuver. The head and eyepiece assembly mounts to the same channel bracket used by the standard FU-500 LCD viewfinder. The signal cable also connects to the camera identically to that of the FU-500. But now for the wrinkle. The FU-1000 uses a power adapter that seats into the camera’s battery mount and provides its own mount for the battery. This adapter converts the battery’s 7.2 volt power to the 9 volts needed by the FU-1000 while sending 7.2 volts to the camera, an intervention that causes a bit of an operational problem as we’ll see later.
Controls and Adjustments
Being a CRT (cathode ray tube, just like a normal television set), the FU-1000 features brightness and contrast controls (labeled B and C, respectively) located along the left edge of the head. The FU-1000 also features a peaking control, labeled P, which will be familiar to broadcast camera operators but likely new to the rest of us. In brief, it enables you to adjust the viewfinder’s edge definition. When peaking is turned up the edges of image elements take on a brighter outline as they come into crisp focus. As a very powerful focusing aid this may be the crown jewel of the FU-1000’s value-added features.
The underside of the FU-1000 is home to several controls. The "Tally" switch controls the four red tally (recording) lamps on the front of the unit. The "Light" switch controls a small lens light designed to illuminate the lens barrel in dim conditions, a very handy feature. Below these switches, a thumbscrew labeled "Lock" controls the rotational tension of the viewfinder’s eyepiece as well as the lateral extension of the eyepiece from the camera body. Here's a tip for those who may not own this unit, but have rented or will at some point rent an XL1S equipped with the B&W EVF: if the viewfinder's tube doesn't hold its position and tends to droop down, simply locate the "Lock" thumbscrew and tighten it. Since it's hidden underneath the viewfinder body, it's not readily intuitive that it's there for increasing the tube's tension.
The bottom of the FU-1000’s eyepiece features a focus adjustment which changes the eyepiece’s focus from +0.5 to –2.4 diopter (+0.1 to –3.2 diopter when the extension tube is attached) to accommodate operator vision differences.
A simple and inexpensive way to increase your shooting comfort level when using this viewfinder (or the color EVF for that matter) is to add a chamois eyecup cover. There are a variety of shapes, sizes and colors available from Hoodman USA and other similar equipment providers, and they eliminate the common problem of sweat from your brow forming on the standard rubber eyecup on most all viewfinders, which is uncomfortable at best, and at worst can obscure the vision of your viewfinder. Even a cheap $15 chamois EVF cover is almost indispensible, practically worth its weight in gold especially on hot days outdoors or under hot lights.
The position of the eyepiece can be controlled in 3 dimensions. It can be rotated in a similar manner as the FU-500’s eyepiece (blue arrow). It can be extended or retracted by turning the grip (yellow arrows). It can also be positioned closer to or further from the camera’s body by loosening the “Lock” screw (magenta arrow). These adjustments are all independent of the eyepiece’s focus adjustment, described above.
The entire eyepiece can also easily be removed for cleaning. When removed it’s easy to see how the actual CRT and reflecting mirror are configured. It’s important to note that you should use the same care cleaning the eyepiece’s lens as you would cleaning the camera’s lens. The inner surface of the lens features an anti-reflective coating that can be damaged with careless cleaning procedures.
Calibrating the FU-1000
The FU-1000 should be calibrated before use to ensure accurate image brightness and black levels. I follow a relatively standard procedure for this task, as outlined below.
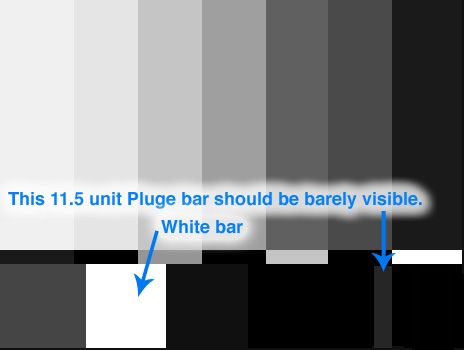
- Feed true SMPTE color bars to the viewfinder. This will be easy for XL1S users, since that camera features SMPTE bars on its "digital effect" menu. XL1 users will have to provide the bars from a recorded tape (ex: from their editing software) or another source.
- Turn your EVF displays off.
- Turn the Brightness and Contrast controls to their minimum positions.
- Now turn the Brightness control up until you just begin to see the gray area of the display.
- Increase Contrast until all divisions of the major bars are clearly visible. At this point, the 11.5 unit Pluge bar should be barely visible.
- Adjust the Peaking control to the point where it displays the minimum amount of edge enhancement around the white block. Setting Peaking too high can give you a premature impression of sharp focus. Setting it too low will keep the image looking soft even when you reach sharp focus.
- Switch-off the bars and restore your EVF displays, if desired.
As you shoot you may find that you have to adjust Contrast to get a better view of some subjects. It’s best, however, to leave the Brightness control set to its calibrated position. Indeed, the FU-1000’s design will remind you of this, since the Brightness knob is much more difficult to reach than the Contrast or Peaking controls.
Comparison to the FU-500 Color LCD Viewfinder
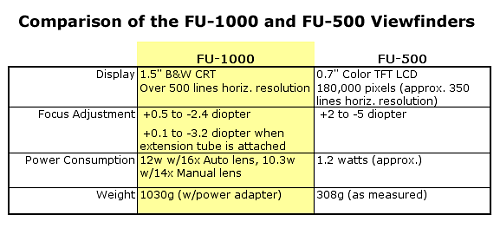
[Fig 10] The most prominent physical differences between the FU-500 and FU-1000 viewfinders are their size and weight. The FU-1000 is much larger and much heavier, weighing-in at 1,030g (approx. 2.27 lbs) including the power adapter, versus the FU-500’s 308g (approx. 0.68 lbs) weight.
The size, brightness and display resolutions of the two viewfinders are also quite different. The FU-500 color viewfinder features a 0.7” 180,000 pixel LCD that translates into approximately 350 lines of horizontal resolution. The FU-1000 features a 1.5” CRT that displays 500 lines of horizontal resolution. Its size, brightness and large lens make it easily visible with the eye a foot or more from the eyepiece.
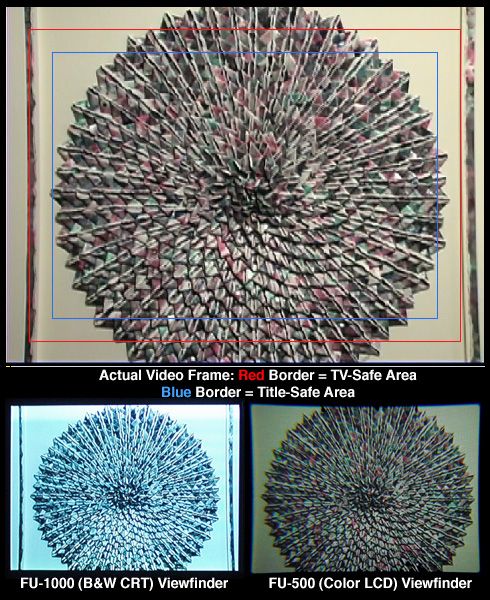
With its increased resolution the FU-1000 displays the entire video frame including the underscan area. The FU-500 displays an area just a bit smaller than the “action-safe”/”tv-safe” portion of the frame.
Two Caveats
The FU-1000 has two design limitations noted only briefly in its small manual.First, if you ever power your XL1S by using a direct a/c connection through your battery charger you’ll have to change your habits. The FU-1000 can only be powered by battery due, apparently, to limitations of its voltage adapter.
The second caveat is more noteworthy. After using the FU-1000 for a while you may suddenly notice that something’s missing from the EVF indicators: the battery level indicator. Apparently the FU-1000’s voltage adapter also confounds the battery level indicator until the battery is nearly depleted, at which point a flashing battery indicator will appear in the viewfinder. This can lend a new level of excitement to your shooting since the FU-1000’s 12w load will drain your battery quicker than the FU-500’s LCD viewfinder. So be sure to stock-up on charged batteries before a shoot and change them before shooting a long sequence. Even better, use the CH-910 dual battery holder.
Summary
The FU-1000 monochrome viewfinder will feel very familiar to professional camera operators accustomed to seeing B&W CRT’s in their eyepiece. It is a very standard ENG style viewfinder adapted to the XL1 / XL1S’ power and resolution. Conversely, it may feel like a step backward to those who have only used color viewfinders on video cameras. Using a B&W viewfinder is very much an acquired skill.As a tool for accurate focus judgment and frame composition, however, the FU-1000 is the ultimate tool available today for the XL1 and XL1S. Its capabilities far exceed those of the FU-500 LCD viewfinder and even those of the best external LCD monitor. The only comparable alternative, although not practical for handheld or mobile shooting, would be a professional CRT monitor with at least 500 lines of horizontal resolution. Still, the FU-1000 has some issues. Its interference with the battery level indicator can be a nuisance, particularly since the viewfinder places a significant drain on battery power. It’s also much heavier than the FU-500, making the XL1 / XL1S even more nose-heavy. Its ability to show the entire frame is very welcome but it would be nicer if it also displayed an action-safe frame for reference.
So do you need the FU-1000? Certainly most XL1 / XL1S shooters use only the FU-500 viewfinder and learn to adapt to its limitations. If, however, you use your XL1 / XL1S for professional applications the significant investment in the FU-1000 would be very justifiable, providing you with a viewfinder on-par with those found only on much more expensive cameras.
One day there will probably be a color viewfinder featuring a display resolution comparable to today’s CRT’s and capable of enabling its user to quickly switch between color and monochrome formats. Until then, there’s the option of the FU-1000.
Credits
Many thanks to Don Palomaki for his kind assistance with data on the FU-500 color LCD viewfinder.
Back to the XL1 Articles Menu
Written by Ken Tanaka
Thrown together by Chris Hurd
Please direct questions to the DV Info Net Community Forums.
Where to Buy: These dealers are authorized DV Info Net sponsors... | |||
|
|
|
|
|
|
|
|
Please support this site by making your purchases through them. Thanks! | |||
©1998-2008 DV Info Net
The Digital Video Information Network
San Marcos, Texas
Suspicion ain't proof.
