The XL1 Watchdog
|
> top of page < |
Hardshell Case for $38
an article by Scott Barber
Since I returned my Canon XL1 hard case because it was so expensive and cheap all at the same time, I've been looking for alternatives. I've looked on the newsgroups, the web, local bicycle shops, the camping and luggage departments in chain stores, wherever I thought might be a possibility. My criteria were that it would be durable, fairly inconspicuous, would include storage for tapes, batteries, etc. along with the camera and its accessories, and wouldn't cost much more than $100. It didn't have to be a hard case, but that was a preference, if I could afford it.
One day, while fooling around at Home Depot, I found my solution... a toolbox. To be specific, a ZAG Magnum 2400 toolbox that cost just under $20! It is hard plastic, with a removable shelf (it's a toolbox..) that doubles nicely as a storage drawer for tapes, batteries, AC power supplies, cables, etc. It also has a set of 4 drawers (16 compartments) in the front of the case that are perfect for adapters, mic batteries, and other small items.
The case dimensions are : 24"L x 13.3"W x 13.1"H
I went to a fabric/upholstery store and purchased some foam in 1/2" and 1.5" thicknesses, enough to line the bottom and sides of the case. I put two 1/2" strips along the bottom (one of which also runs up the front side a few inches, providing extra protection for the left side of the camera and the lens), the 1.5" pieces on the sides, and a 1/2" strip across the back.
I cut the foam using a little razor utility knife (the blade extends out 4-5 inches, with blade sections that break off - I purchased at a local grocery store's economy bin for $1). I can't overemphasize the importance of this little knife. It's worth the trouble to find one. You start by lightly "scoring" the foam using long, straight strokes. Then you gradually deepen the cut using the same light touch. You can get some really nice, even cuts this way.
I customized the foam so that it would fit nicely inside the case and would conform to the walls. I also cut a layer of 1/2" to go over the top of the camera, which may need to be replaced from time to time after being handled frequently, but it protects the camera from the upper shelf, in case the case gets turned over or upside down. It also helps to keep the camera nice and "snug" within its little padded cell.
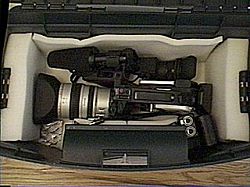
Note that the camera won't fit in this particular case without removing the viewfinder and mic assembly (which I had hoped to avoid). Neither will it pack with the MA-100shoulder mount/XLR adaptor attached. However, both of those things fit nicely inside the case alongside the camera. Since it's a fairly simple matter to install the EVF and mic assembly, and since I don't always use the shoulder mount anyway, this was an acceptable compromise for me which avoids having to get a larger case.
I might add that I was careful to figure out a way to store the EVF assembly and the XLR adaptor in a way that wouldn't damage the wiring or connectors. Basically, I lay the back side of the EVF on the floor just next to the tape compartment, and up as close to the zoom control assembly as possible. This allows the mic to rest on the zoom control, and the EVF and mic wires are left completely uncrimped.
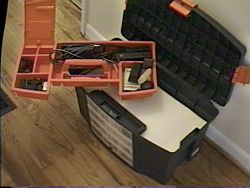
The case is dark green with an orange/black carrying handle, and orange "snap-shut" handles on the sides. It does look nice (for a toolbox), but wouldn't attract as much attention as the shiny (and brashly marked) case from Canon.
It's not a heavy box, and with the camera and some extras, doesn't weigh as much as I expected (probably 13-15 lbs). Also, it would protect the camera (although not the adaptors in the front drawers) against rain, but it isn't totally watertight. There are some small holes underneath the handles that would let in humidity, and if the case were upside down, then rainwater could get in.
As for the costs, the special spray foam glue cost $12, or about half the cost of the box and the foam. The knife was $1. So for about $38 and about an hour of foam cutting, I have a case that is much, much MUCH better than the $300 Canon case. Actually, I would put it up against any of the $200-300 pro camera cases I've seen.
Also, I think I would feel comfortable shipping and/or checking the camera in this case, although I may still carry the camera onboard planes to avoid any possibility of theft. I would feel even more confident about checking/shipping it if there was another 1/2" of foam in the bottom of the case. I didn't add it because it would cramp things a bit too much up top. You could choose to dispense with the removable shelf, and then there would be plenty of room for even more foam on top and bottom, and still leave room for the AC adaptor and some cabling.
Clearly, I feel much better about this than I would a soft case, and I wouldn't hesitate to sit on or stack other stuff on top of this case, as I often do. And there is much more storage space for tapes, batteries, etc. than I've seen in pro camera bags costing 10 times this much.
I hope this helps those of you out there who have been trying, as I have, to find a decent alternative to expensive and often inadequate cases for the XL1.
Scott Barber is "in the biz" at New Context Video Productions in Asheville, North Carolina.
Back to the XL1 Articles Menu
Thrown together by Chris Hurd
Please direct questions to the DV Info Net Community Forums.
Where to Buy: These dealers are authorized DV Info Net sponsors... | |||
|
|
|
|
|
|
|
|
Please support this site by making your purchases through them. Thanks! | |||
©1998-2008 DV Info Net
The Digital Video Information Network
San Marcos, Texas
Black Gang should stand their watches in the engine room.