
Performance
Both cameras use conventional, single CMOS sensors with Bayer-pattern color filter arrays and “rolling shutter” readouts. Unusually for motion picture cameras, neither one has an anti-aliasing (optical low-pass) filter.
Resolution and Spatial Rendering
The Cinema Camera‘s chip is 2432 x 1366; according to Blackmagic, that’s the active pixel count. When shooting ProRes or DNxHD, the camera internally demosaics the image and resizes it to 1920 x 1080. When recording DNGs, the resulting files advertise themselves as 2400 x 1350. Blackmagic says the “missing” 16 pixels on either side, and the 8 above and below, are retained in the file and used for filtering and resizing. This makes a lot of sense, as dealing with edge conditions is a bit of a bother in image processing. Nonetheless, the available pixel count for resizing, zooming in, and repositioning, is 2400 x 1350.
<rant>
It’s a 2.4K camera, honestly and truly. Yet the camera advertises itself as “2.5K”, to the point of saying so in its menus and on its status line. When I asked Blackmagic why, they said:
“The active sensor resolution is 2432 x 1366, so we round up to 2.5K instead of 2.432K. We use 2.5K to show it’s larger than HD and thus, gives you the room for framing for HD without the need to zoom in on the image.”
Now, there’s nothing wrong with a 2.4K camera; it’s an honorable and praiseworthy thing. But a 2.4K camera that sells itself as a 2.5K camera? That’s just gratuitous embiggenation, and it makes Blackmagic look bad: it sends the message that we can’t trust Blackmagic on any of its figures.
This makes me sad.
</rant>
The normal rule of thumb for Bayer-pattern sensors is that you’ll get usable resolution of about 80% of the pixel count. By that metric, we could expect 1920 lines, or 1080 TVl/ph, from the Cine Cam’s sensor.
But that assumes an optical low-pass filter (OLPF).
Without an anti-aliasing filter, the effective luma resolution can theoretically run right up to the pixel count (leaving aside complications of saturated red-only and blue-only subjects, among other things). The downside, of course, is the risk of aliasing: moiré patterns in chroma and/or luma; shimmering colored edges on sharp transitions, color speckle on fine-grained details like sand or gravel, and (depending on the demosaicing algorithm used) “zipper patterns” along horizontal and vertical edges.
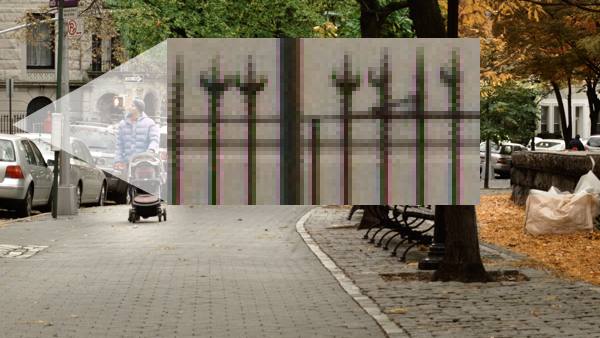
Let’s look at the MegaTrumpet resolution chart from DSC Labs:
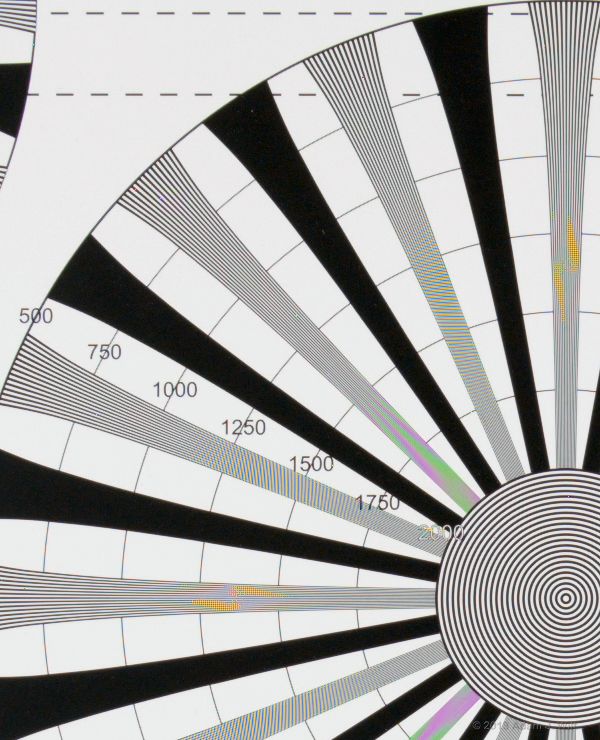
1:1 transcode in Resolve from raw to ProRes of the 2400 x 1350 original Cinema Camera image. Any visible compression artifacts are due to the JPG compression for the web.
Yow: there’s sharp detail, not just to 1080 TVl/ph, but all the way to 1350 lines… and beyond that, too, though what’s beyond is aliased. Also, see those “plaid” patterns, mostly yellow/orange, near the 1350-line point in both H and V trumpets? Those are the onset of “zippering”. And the false color, oh, the false color…
…but keep in mind that (a) this is a square-wave chart, not a sinusoidally-varying zone plate, so it’ll throw off more aliasing at any point than the numbers alone should suggest; (b) very, very few things in real-world images are as hard to reproduce cleanly on a naked Bayer-pattern sensor as a resolution chart; and (c) only freaks and geeks spend their time shooting such things anyway (guilty as charged, yer honor). The two things to take away are:
- Dang, that’s one sharp and crispy image.
- You might want to be careful when shooting fine, repetitive patterns in real life, just in case.
Now, let’s resample the 2400 x 1350 down to 1920 x 1080 HD in Resolve:
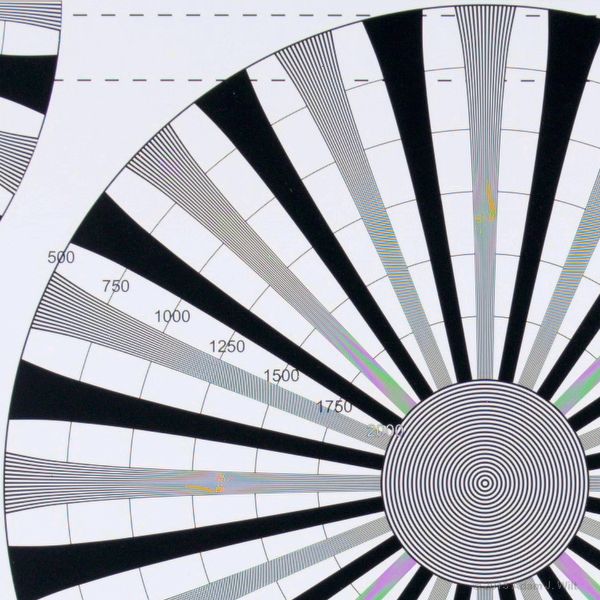 1:1 transcode in Resolve from raw to ProRes of the 2400 x 1350 original Cinema Camera image resampled to 1920 x 1080. Any visible compression artifacts are due to the JPG compression for the web.
Again, this is mighty crisp for a 1080-line picture. Of course, unaliased resolution doesn’t extend past 1080 lines, but those problematic “zipper” areas start getting smushed together by the resizing, so they’re less problematic.
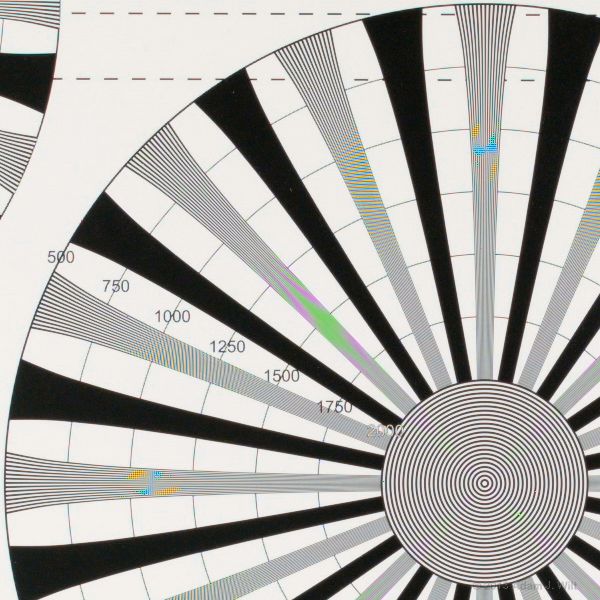
What about ProRes, straight from the camera?
 1:1 section of Cinema Camera ProRes 1920 x 1080 image. Any visible compression artifacts are due to the JPG compression for the web.
The ProRes image isn’t quite so edgy as the DNG-sourced version, and the aliasing artifacts are a bit different, with a bit more spurious chroma. The camera’s internal processing is clearly handling things a bit differently from Resolve.
The Pocket Cinema Camera‘s sensor is 1920 x 1080 (isn’t it odd how Blackmagic doesn’t seem to feel the need to promote it as a “2K” camera; 2.4K has to be inflated to 2.5K, but plain old HD is fine being just plain old HD? Not that I have an opinion, mind you).
1:1 section of Pocket Cinema Camera raw 1920 x 1080 image, transcoded to ProRes in Resolve. Any visible compression artifacts are due to the JPG compression for the web.
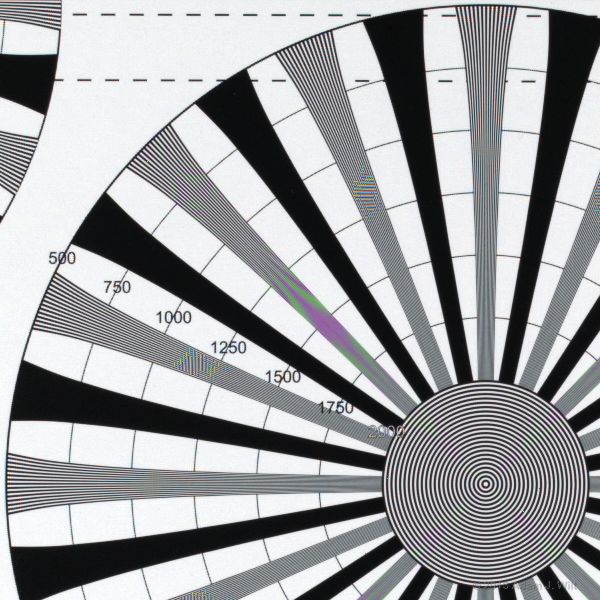
1:1 section of Pocket Cinema Camera ProRes 1920 x 1080 image. Any visible compression artifacts are due to the JPG compression for the web.
Again, the on-board ProRes isn’t quite as snappy as as the DNG image, but – possibly because no resizing was needed in-camera – the ProRes is a bit quieter in terms of chroma artifacts. Both images resolve up to 1080 TVl/ph, before plunging off into alias-land.
Scary pictures? Perhaps, but consider that it doesn’t ever get any worse than this in real-world photography, and only rarely does it come close to being this visibly aliasy. These cameras are cleaner than a Canon 5D Mk II or a 7D, and much sharper, and the Canons have been used for feature films and television with excellent results.
In practical, real-word photography, both Blackmagic cameras make crisp, sharp images. Aliasing isn’t nearly as apparent, 99% of the time, as it appears on these charts. Look, for example, at Marco Solorio’s comparison with the 5D Mk III or his “Texting is Dangerous” PSA; or John Brawley’s Pocket Cinema Camera sample files; or just search for “Blackmagic Cinema Camera samples” online, and you’ll get an eyeful: good pictures with minimal artifacts.
Just be mindful; aliasing artifacts can jump out under certain circumstances:

This is probably the most common occurrence: chroma moiré generated by woven textiles. Unless you’re trying to capture a sample image as I was in this test, you’ll likely never see it… until you’re presented with an important interview subject, whose clothing shimmers and dances with color (if you’ve shot video with DSLRs, you’ve probably encountered this situation). The solution? Zoom in, zoom out, defocus slightly, or call for a wardrobe change. The same subject matter photographed above is present in the IR images below; those images, at a different zoom level, show no such moiré.
[Pocket Cinema Camera, Nikon 50mm f/1.4, ProRes Recording. Original image © 2013 Paul Karlin]
Here’s an example of “zippers”, which occur – rarely – when horizontal or vertical details just happen to be about a pixel wide, and aligned just so. It’s an occupational hazard with Bayer-pattern sensors, and the lack of an OLPF only makes it more so. Still, I’m using an image from New York filmmaker Paul Karlin here because, despite my best efforts of going out and trying to provoke this artifact, I wasn’t able to get as clear an example as Paul did – that’s how infrequently this artifact occurs. Blackmagic’s engineers have done a superb job here.
The bottom line? These cameras make crisp, detailed, satisfyingly immersive renderings of real-world images. Once in a while, aliasing artifacts can arise, but if you know what to look for, you can almost always catch them and work around them.
Tonal Scale
Blackmagic advertises a 13-stop dynamic range for these cameras. I’ll leave the definitive test to Art Adams and his 21-stop Xyla chart; I just did an informal quickie with a 41-step, 13.3 stop Stouffer density wedge (by “informal”, I mean I set up the Stouffer wedge and diffusion backing in front of one of my Kinos, and eyeballed it for even exposure, but I didn’t haul out the spotmeter and ensure that the illumination was flat to within 1/10 stop across the entire image area the way I normally do. It’s quite possible the light wasn’t perfectly even, so my numbers below may be off by half a stop or so in either direction).

Stouffer wedge, Cinema Camera, Film gamma

Stouffer wedge, Cinema Camera, Video gamma
The Stouffer wedge uses 1/3-stop steps. I counted the number of steps visible between 100% exposure and the point where I could no longer see where one step stopped and the next began, even with extreme gamma changes to stretch out the shadows (don’t try this at home: the 8-bit JPGs above lack the shadow detail of the 10-bit ProRes or 12-bit raw originals).
I saw at least 11 stops of clean, 1/3-stop steps in the Cinema Camera’s Film gamma images, with another stop and possibly a bit more where there was a visible exposure change, although I couldn’t clearly see the dividing line between steps. Let’s call it 12+ stops, and await Art’s tests.
In Video gamma, I was able to count about 9.6 stops.
For the Pocket Cinema Camera, I saw 11.6 distinct stops in Film gamma, plus a little bit more, and 9.6 stops in Video gamma.
Overall, not too shabby for cameras costing $1000 and $2000.
Rolling Shutter
I measured the rolling shutter of the Cinema Camera at about 1/44 second, and the Pocket Cinema Camera clocked in at around 1/59 second. Practically speaking, you have to shake the Pocket Cam around about 50% faster than the Cine Cam to get the same amount of jello.
(The numbers also set upper limits on how fast the cameras’ frame rates can go. Some people are wondering if 60p, 120p, or higher frame rates are possible in some future firmware upgrade. Setting aside the speed of the image processors, the storage pipeline, and so on, the sensors themselves answer that question: no, at least not at full-frame resolution.)
Other Image Characteristics
Both cameras seem to render colors the same way, and both are near-infrared sensitive to pretty much the same degree. I shot the same scene with 5600K KinoFlos, and an IR-rich tungsten lamp: a 500W Tota-lite, nominally 3200K but more likely around 2900K-3200K. No ND filters were used. I didn’t perfectly match the neutral blacks in these two images; still, you get the idea:

The Cinema Camera suffers “black sun” overloads: aim it at a very bright light, like, erm, the sun, and the excessively overexposed bit of the image goes dark:

I wasn’t able to get “black sun” overloads from any standard household fixtures, so I doubt it’ll be an issue unless you’re shooting directly into the sun or other very bright lights.
The Pocket Cinema Camera showed no “black sun” artifact of any sort. There’s talk of “white orbs” on early builds of the camera, a sort of excessive flare or blooming artifact from specular highlights, but I wasn’t able to see anything of the sort that didn’t flare just as bloomingly when I put the same lens on another camera from a different manufacturer.
Audio
Audio is a mixed bag. With carefully-calibrated line-level inputs, both cameras are capable of recording excellent sound. The problem is that that “sweet spot” is rather narrow, and the cameras, lacking audio level meters, don’t do much to help you find it.
With the Cinema Camera, line in is very clean, with a flat frequency response and low noise. Just remember that the Cinema Camera is expecting professional, +4dBm levels.
The Cinema Camera’s mic inputs are very tinny, with no bass, as if they have a severe wind-cut (high-pass) filter always applied. If mic input signals are strong enough that the input gains must be set below about 35%, input-stage overload distortion is audible. Gain the input up enough and you’ll start clipping; neither camera seems to employ any sort of peak-end limiter to prevent clipping.
On the Pocket Cine Cam, line and mic are of equal tonal quality, with no thin, tinny quality on the mic setting. However the inputs are very fragile: the preamp is exceedingly easily overloaded. If the incoming feed is hot enough that you’re pulling down mic gains to 50% or below, the input stage will almost certainly be distorting and fuzzing out on the peaks. If mic gain is at 5%, you’ll be hard-pressed to get anything above -24db (as metered externally via embedded HDMI audio) that isn’t smothered in overload distortion.
And there’s no peak limiter; get a clean signal in and gain it up just enough, and you’ll crash hard into the gritty ceiling of 0dBFS, with truly nasty results.
Also, bear in mind that the Pocket wants consumer-level, -10dBm line inputs.
Of the two, the Cine Cam seems more tolerant of widely-varying input levels, but you’ll want to feed it line level to avoid the hollow quality of mic-level amplification. With either camera, I’d suggest leaving internal gains at 75%-100% and using an input mixer (with a peak-end limiter) for level control – or use camera audio as a scratch track only and record production audio separately.
The cameras’ internal mics are suitable for scratch audio and casual ambient recording. Like all such mics, they’re very susceptible to camera handling and operational noises. On the Cinema Camera, the mic does an excellent job of recording the whoosh of the internal cooling fan.
Internal mics are automatically disabled when you plug in an external audio feed.
Speed and Responsiveness
The Cinema Camera can start recording about 4 seconds after you first press the power button. The Pocket Cinema Camera is ready to roll in 2.5 seconds.
The Pocket Cine Cam’s autofocus uses contrast detection, and its speed is dependent on the lens, the light level, and the aperture. In decent light, a responsive lens like the 12-35mm typically focuses in about two or three seconds. A mechanically-driven lens like the Lumix 20mm pancake takes longer, focusing incrementally in short bursts over a three to five second period. In low light, the camera may hunt for five seconds or more, and then simply give up. AF is best used to acquire focus before rolling; it’s not especially useful for “live” focus pulling.
Manual focus is always available: this is a big deal, as servo-driven MFT lenses, at least those I have, are “focus-by-wire” devices, with no actual mechanical coupling between focus ring and internal mechanism. Every lens I tried is buttery-smooth and instantly responsive on the Pocket… with one exception.
Two of the Olympus primes, the 12mm f/2 and the 17mm f/1.8, have a “snapshot” focus ring. In its normal, forward position, it’s a typical free-spinning, no-endstop, focus-by-wire control. Pull it back, though, and you’ll get a focusing scale with hard endstops (operationally, it’s like the focus ring on the Sony PMW-EX1). The focus is still servo-driven, only now the focus rings sends absolute position commands, not rate commands. On my GH3, the 12mm lens works very well, and very quickly, with the focus ring in either mode. On the Pocket Cine Cam, pulling the focus ring back makes focusing slower: it’s as if the camera waits for me to stop turning the ring before it sends a focus command to the lens. Push the ring forward again, and focus becomes instantly responsive once again.
Manual aperture setting can be a bit tedious. Each push of the open or close button changes iris by 1/4 stop, and neither button auto-repeats if held down (interestingly, the same up/down buttons that won’t auto-repeat for iris control will auto-repeat when using the Pocket’s menus. So it’s not that they can’t, it’s just that they won’t).
When either camera is turned on, it will attempt to set an appropriate aperture; it won’t remember what aperture was last set. The Pocket will also reset lens focus on every startup. This makes for a bit of extra work if you get into the habit of powering down the camera between shots. Also note that the Pocket will reset, losing focus and iris, if you switch between ProRes and raw; the Cine Cam will reset if you switch it into or out of DNxHD.
Of course, if you’re using a fully manual lens on either camera, none of this newfangled electronic foolishness will affect you in the slightest.
Exposure
The autoexposure (IRIS) function works differently for Video and Film recording modes. In Video mode, pushing IRIS sets the lens aperture using what appears to be center-weighted averaging, aiming for an overall exposure of middle gray. If I shoot a gray card and push IRIS, the signal level, monitored with an external waveform monitor, settles at around 40%.
If I have the camera in Film gamma, IRIS appears to use “expose to the right” (ETTR) as its algorithm: it’ll open (or close) the aperture to the point where the bright bits of the scene are just on the verge of clipping. Shooting the gray card in Film mode, IRIS will set the levels between 95% and 100%.
The cameras are very conservative with ETTR; almost any bright object in the shot, even if quite small, will have the exposure set for it:

Here’s a shot out the windshield of a car, late one night in Los Banos, CA. ISO 800, f/4 on the Lumix 14-140mm f/4-f/5.8 lens, exposure set manually. This is a Film mode shot, and uncorrected: I haven’t changed the gamma, nor have I boosted saturation back to a “normal” level (Film mode has about half the color saturation of Video mode).
Note: Even though the taillights and traffic lights are several stops overexposed, they retain a pleasing element of color instead of blowing out to white, as many digital cameras would do. I saw this time and again: overexposed highlights held their color in a very “filmic” way, and I really had to work at it, with extreme overexposure, to cause anything to blow out completely to white. Well done, Blackmagic!
Then I pushed IRIS:

The camera set the aperture to f/12 (if I recall correctly) to guarantee that none of the lights was in danger of clipping.
Most of the time, ETTR’s effect isn’t that extreme, simply because most scenes aren’t that contrasty. But the cameras will favor highlight protection, pretty much regardless of the rest of the scene.
Art Adams argues, convincingly, that ETTR shouldn’t be relied on for film or video. It’s fine for stills, he says, because stills are seen in isolation: capture the entire tonal scale, push it around in your image editor, and you’re done. But movies are made of multiple shots cut together, and it’s more important to have a consistent exposure and noise structure (or “grain”, in old-school terms) from shot to shot than to guarantee highlight protection. Instead, expose for the important stuff: put faces where they belong in the tonal scale, and make sure they render properly and consistently from shot to shot, and let highlights and shadows do whatever they will (I oversimplify a bit, but I hope you get the idea).
Given that the two cameras use ETTR in Film mode, and have but a single zebra for exposure confirmation, you might well ask how to best set exposures. You can use a separate EVF or monitor with a false-color mode, perhaps, or a waveform monitor; I found that I was quite happily using my handheld light meters once again.
Conclusions
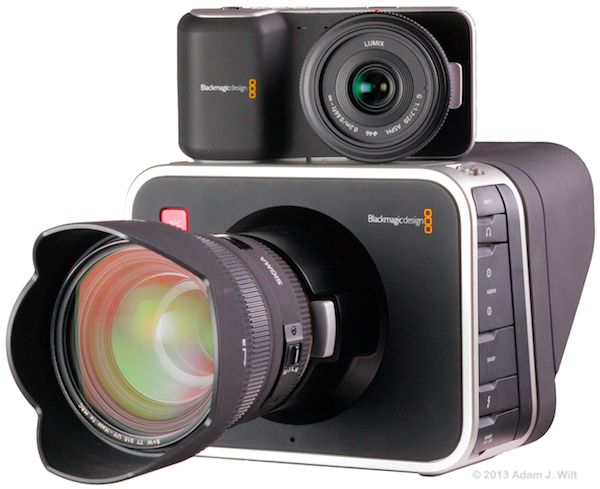
The Blackmagic Cinema Camera and Blackmagic Pocket Cinema Camera are unlike anything else around. They offer your choice of lossless raw recording, or 220 Mbit/sec ProRes422(HQ) or DNxHD (the latter on the Cine Cam only), using single sensors midway in size between Super35mm and 2/3″. The sensors lack OLPFs for ultimate sharpness, at the risk of increased aliasing artifacts. The cameras offer nearly 13 stops of dynamic range, using a log curve and a color space fully supported in DaVinci Resolve. They are designed with complete disregard for current thinking in handheld camera ergonomics (though the Pocket Cinema Camera handles very much like a point-and-shoot still camera). They buck the current trend for complex menus with everything-including-the-kitchen-sink options, opting instead for a tightly focused, minimalist collection of settings.
They capture images as crisp as anything else you’ll see in HD. They will occasionally show more artifacts than a high-quality 3-chip camera, or a high-end LSS camera (think RED, Alexa, F55, C300, etc.), but they blow away any of the DSLRs, and other video/cine cameras with DSLR-derived sensors. To my eye, the pix from the 2.4K Cinema Camera are just a little bit smoother, a little bit cleaner, and a little bit more naturalistic than those from the 1.92K Pocket Cinema Camera, but it’s a fairly minor difference; they intercut nicely. Pixel-peepers may quibble about quality, but most people will simply say, “nice pix!”, and get to work.
They offer a wide dynamic range, wider than anything else outside of RED/Alexa/F55/etc. territory, and a streamlined raw workflow in Resolve, with all the grading freedom that implies. For those unwilling to go the raw route, they offer production-quality compressed codecs in either a Video gamma and color space, or the same wide-dynamic-range Film mode, giving you pretty much all the same grading options aside from losslessly changing white balance in post.
The Cinema Camera records on bog-standard 2.5″ SSDs, while the Pocket uses SD cards. Both may be formatted as ExFAT or as HFS+, for use on PCs or Macs as you see fit. Any SATA drive dock and any SD card reader may be used for transferring clips and reformatting media; there’s no need for proprietary media stations. DaVinci Resolve is available for Windows PCs and Macs alike.
What’s not to like? Well, moiré can be an issue; audio is finicky; the sparse status displays (e.g, no indication of pixel-for-pixel magnification mode) can lead you astray if you’re not paying attention. For serious handheld work you’ll need to build a rig. The cameras demand loupes or EVFs for exteriors, and separate audio mixers for decent sound. Neither camera has built-in ND filters. The Cinema Camera suffers from “black sun”, and both cameras’ rolling shutters give you jellocam pix if you get too jiggly with ’em.
Also: no super slow-mo, no tweakable matrices, no optical steadyshot, no clear scan, no external sync, no CCU port, no fancy timecode settings, no tilt-and-swivel EVF, no histogram (before firmware version 1.9.3) / false-color / WFM display, no built-in coffee-maker.
But consider: $995 for the Pocket Cine Cam. $1995 for the Cine Cam. You’ll have plenty of cash left over; go get yourself a standalone coffee-maker. From a price/performance standpoint, these are pretty exciting tools. No, strike that: these are very exciting tools.
Sure, starving indies will snap ’em up, but they’re not the only ones. DP Rodney Charters, ASC, is using the Pocket on his latest TV show: he’s been posting pictures of the Pocket on his Twitter feed. TV news photographer Brian Hallett uses both cameras; he writes about ’em here, here, and here. Don’t worry about what niche or category the cameras fall into, think instead about what they can do for you.
If you need DNxHD, SDI video output, or Thunderbolt connectivity for monitoring or capture, the Cinema Camera is the clear choice. The larger camera also has the edge in spatial image rendering quality; having 25% more pixels in the image does make a difference. It’s a better choice for tripod work, with its bigger studio-finder LCD and its higher “ground clearance” for large lenses. The EF model is the obvious choice if you own a lot of EF glass; the MFT version offers you a wider choice of lenses via mount adapters, but be aware that the passive mount limits you to manually-controllable lenses.
If compactness, mobility, naked handholdability, or (dare I say it?) sheer enjoyment is the issue, the Pocket Cinema Camera is the way to go. It’s tiny – with a small lens, it actually will fit in a pocket. Its active MFT mount lets you use the widest variety of lenses, including active MFT lenses.
The Cinema Camera spent most of its time on a tripod or sitting on my desk, but the Pocket and a handful of lenses got thrown in a bag and went places with me, just for the fun of it. “Have 12+ stops, will travel”, could be this little camera’s motto; in these days of reduced baggage allowances, I expect to see a lot of Pockets doing docco and remote location work.
[If you’re worried about the “small” sensor size (compared to Super35mm) and the availability of wide-angle lenses for either camera, Metabones has just today announced Speed Booster Nikon-to-MFT Blackmagic adapters, which effectively widen the angle of view of an attached lens while simultaneously increasing the effective aperture. I haven’t seen them, but Andrew Reid at EOSHD has a first look.]
Pros
- Wide dynamic range, uncompressed or losslessly compressed raw capture.
- Wide-range or video-gamma ProRes or DNxHD capture (DNxHD on Cine Cam only).
- Highest possible resolution for the pixel count, due to lack of anti-aliasing filter.
- Crisp, sharp, detailed pictures.
- Highlights hold color extremely well: “filmic” rather than “digital”.
- EF and MFT mounts allow a wide range of affordable lenses.
- Very simple, straightforward menus; almost film-camera simple.
- Solid and attractive build quality.
- DaVinci Resolve understands these cameras’s raw format.
- Probably the “most picture per dollar” available today.
Cons
- Risk of chroma moiré and other aliasing artifacts, due to lack of anti-aliasing filter.
- Very finicky audio inputs with no onboard level metering prior to firmware 1.9.3.
- Handheld ergonomics are indifferent (Pocket Cine Cam) to nonexistent (Cine Cam).
- LCD marginal (Cine Cam) to unusable (Pocket Cine Cam) in bright daylight.
- Terse status displays (no time-remaining indicator prior to firmware 1.9.3, no zoomed-in indicator, overly subtle dropped-frame indication, etc.) greatly increase the odds of operator errors during production.
- Poor battery life; external power (Cine Cam) or multiple batteries (Pocket Cine Cam) usually needed.
Cautions
- AF (Pocket Cine Cam) only suitable for initial setup, not for live focus pulls.
- No continuous AF, no continuous auto-iris.
- No internal ND filters.
- Be sure to use approved media to reduce risk of dropped frames.
- Cine Cam won’t show zebra on external display while recording ProRes or DNxHD.
- “ETTR” metering in Film mode may not always yield best results; use a light meter.
- Playback only shows clips recorded in camera’s current format; any other clips are invisible.
- Status line must be watched very closely to detect end of media or dropped frame indications.
- Rolling shutter (1/44 sec on Cine Cam, 1/59 sec on Pocket) results in jello artifacts on fast pans, shakycam moves.
- At $995, the Pocket is so darned cheap, you’ll be tempted to get one even if you have no actual, conceivable, rational need for one. Not that I have an opinion, or anything…
Bottom Line
If you want the most “picture per dollar” you can get – the highest resolution, greatest dynamic range, least compression, and lowest expenditure for the quality obtained – it’s hard to argue against the Blackmagic cameras. Just be prepared to deal with these cameras’ idiosyncrasies, as they lack many of the modern conveniences of more traditional (and pricier) cameras, like good ergonomics, audio level meters (and robust audio inputs), comprehensive status displays, genlock, settable timecode, or internal ND filters.
And with great power comes great responsibility: the responsibility to watch out for potential aliasing, caused by that same lack of an OLPF that gives these cameras so much of their resolving power.
Disclosure: Blackmagic Design sent me a Cine Camera, Pocket Cine Camera, recording media, camera handles, HDMI-to-SDI mini converter, and an external battery for review. All that equipment will be returned after Art Adams has had a shufty at it for his own review. Blackmagic Design previously supported us with a loan of a full version of DaVinci Resolve for our Sony FS700 4k Cine Gear project. Aside from that, there is not and has not been any material connection between myself and Blackmagic Design, other than as a satisfied customer; Blackmagic has not paid me or given me other considerations in return for the review. DSC Labs previously supplied me with the MegaTrumpet chart. I own the EF and MFT lenses used to review these cameras, all purchased on the open market for earlier projects. A representative of Blackmagic Design has reviewed this article for technical accuracy, but the opinions expressed are entirely my own.
About the Author
 Adam Wilt is a software developer, engineering consultant, and freelance film & video tech. He’s had small jobs on big productions (PA, “Star Trek: The Motion Picture”, Dir. Robert Wise), big jobs on small productions (DP, “Maelstrom”, Dir. Rob Nilsson), and has worked camera, sound, vfx, and editing gigs on shorts, PSAs, docs, music vids, and indie features. He started his website on the DV format, www.adamwilt.com/DV.html, about the same time Chris Hurd created the XL1 Watchdog, and participated in DVInfo.net’s 2006 “Texas Shootout”. He has written for DV Magazine and ProVideoCoalition.com, taught courses at DV Expo, and given presentations at NAB, IBC, and Cine Gear Expo. When he’s not doing contract engineering or working on apps like Cine Meter, he’s probably exploring new cameras, just because cameras are fun.