The XL2 Watchdog
Introduction
|
> top of page < |

The XL2 Watchdog's Tips & Tricks
This section offers some operating tips gleaned from savvy XL shooters for the benefit of others. The idea here is to have a place to point everyone who asks, "how do I do that again?" without having to keep reposting the same information on usenet. I got the idea from watching how many times people have asked how to generate color bars on the Sony VX1000. The only way this page will be worth anything is through owner's contributions... so send 'em in and I'll post them here.
Do Not Mount the Century Optics WA Adapter on the 20x L IS Lens
Unfortunately, due to the extreme curvature of the front element in the new 20x L IS lens, it is not possible to use an existing Century Optics XL wide-angle adapter properly. The front element of the 20x L IS lens will make contact with the back element of the Century WA adapter before it is securely fastened, and you run the risk of scratching the glass on both pieces. Hopefully it's just a temporary situation for which Century Optics will quickly find a remedy.
Update, Nov. 2004: Century Optics has informed the Watchdog that it has introduced a new .7x wide angle adapter, model no. VS-07CV-XL2, which will work with both the 20x L IS and the 16x IS II automatic lenses. All other accessories such as the .6x VS-06WA-XL2, both fisheyes VS-FEWA-XL or VS-FEWA-3XL, and the 1.6x VS-16TC-XL will work fine with the 20x L IS automatic lens.
Make Sure the Switch is Switched
On the AV jack panel next to the battery well on the right side of the XL2, you'll find an S-video jack, a BNC video jack and a yellow RCA composite video jack. There's a small switch just to the left of the BNC jack which toggles the video signal between the BNC and RCA video jacks. If you're plugged into one of these two jacks and you're not getting a signal, it's probably because this switch isn't positioned correctly. It's very tiny and kind of easy to miss!
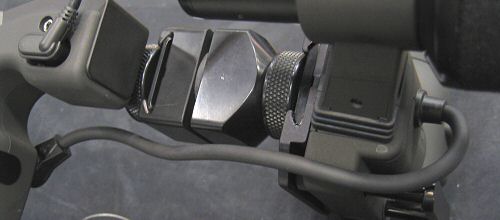
Proper EVF Connection while using the SI-XL1 System Isolator
The SI-XL1 System Isolator accessory from LightWave Systems is an effective tool which serves dual purposes. First, it helps to dampen noise from the zoom motor and tape transport before it reaches the microphone, and second, it moves the EVF assembly forward about 1.5 inches which can help some shooters with balancing the camera further back on the shoulder. The SI-XL1 is in fact compatible with the XL2, but it requires two slight adjustments in the process of connecting the EVF assembly to the XL2 body. One: Be sure to loosen the mic clamp and slide the mic toward the rear. This will allow the mic cable to reach its jacks on the XL2 body (photo above left). Two: Detach the EVF cable from the little keeper spring on the underside of the EVF. Route this cable around the lower right portion of the EVF assembly in order to give it enough length to reach its connection jack on the XL2 body (see photo below). That's all it takes!
No Strings Attached
This tip has been brought forward from the XL1 days. Little one-chip camcorders usually have their lens caps tethered to the hand grip so they don't get lost. Canon assumes that with XL lenses, you're grown up enough to keep track of the lens caps, so there's no strings tied to them. I usually shove the cap in my back pocket (and subsequently forget about it), but my friend Douglas Spotted Eagle has a better idea.
Douglas grabbed some inch-long adhesive-backed velcro strips. One side (hook or loop, doesn't matter which) goes horizontally across the front of the lens cap; the other side is affixed along the top of the lens hood. Now you've got a secure place to stick that lens cap, and since it's not out of sight, it won't be out of mind.
Cheap Trick
Another tip from the XL1 era, it still applies to the XL2. From Andy Clark:
"I had a problem with the EVF coming loose all the time, even with the U-shaped rubber washer that came with the camera. So, I picked up a neoprene washer from Home Depot -- I think it cost me about fifty cents. I removed the EVF and pulled the washer around the bolt, between the thumbwheel and the square piece of metal that holds the EVF on. Now, when I tighten down that thumb wheel, it stays tight. This also worked well on the camera light that I put on the accessory shoe."Display's the Thing
From William Capolongo:
"...I couldn't get the shutter speed info in Aperture Priority mode and aperture info in Shutter Priority mode, until I found out that I could push the AE lock button and this info would be displayed."Cinematographer Ross Lowell offers some XL wisdom
Author of the excellent Matters of Light and Depth (a must read for any videographer) and Academy Award reciever for inventing the Lowel-Light system of location lighting, Cinematographer Ross Lowell is one of the first XL1 shooters. These XL1 tips which he suggested back in 1998 still apply to the XL2 today:
"In the limited time I've used the XL, I loved it and began to realize that its many modes of operation included several intended (entirely or mainly?) for stills: "Shutter" and "Aperture Priority" for example.
Tip 1: "My favorite, so far, for video shooting is "manual mode" with zebra stripes displayed; this also includes a meter display in the viewfinder. The zebra stripes are useful not just for shooting on the African plains (where one might also need leopard spots) but to control detail in large, overly bright or glaring areas. This allows for judgements to be based on either the amount of stripes deemed acceptable or the appropriate amount above or below "normal" exposure as indicated by the internal meter representation. Naturally, such judgements should be based upon subject, mood and desired effect. An extreme example: a proper silhouette can be acheived only with a meter that seems to be warning: "Idiot! Do something immediately or the shot'll be hopeless!" And, unless you like grey snow, you need to open up a stop and a half or two stops from what the meter would have you believe is correct exposure.
Tip 2: "A cheap, useful accessory: a bean bag that will support the camera and allow for limited tilting and leveling for those on-the-ground low angles. It will also keep your XL1 clean.
Cannibalize Your Canon L1 or L2
Bob Anderson notes:
"If you have a Canon L1 or L2 hanging around you can use that mic on an XL. I like the L1 mic's flexibility...you can have it in a stereo mode from (90 to 180 degrees) or in zoom mode. The L1 mic will attach to the "shoe" on the XL. It won't fit into some hardshell cases this way, but you can just slip the support bracket from mic into the XL1 mic holder."Feed Your Dog
Got any tips, tricks or cautionary warnings about this camera? Do your civic duty and share them with the world... give the Watchdog a bone.
Thrown together by Chris Hurd
Please direct questions to the DV Info Net Community Forums.
Where to Buy: These dealers are authorized DV Info Net sponsors... | |||
|
|
|
|
|
|
|
|
Please support this site by making your purchases through them. Thanks! | |||
©1998-2008 DV Info Net
The Digital Video Information Network
San Marcos, Texas
Even a blind pig can find an acorn once in awhile.