The XL1 Watchdog
|
> top of page < |
Using the Steadicam DV
an article by Jim Treganza
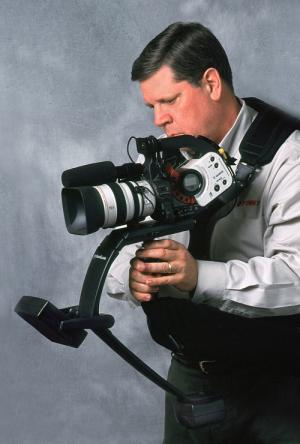
Last fall, when I saw Cinema Products' new Steadicam DV at the Digital Video show in Pasadena, California, I knew that I would eventually own one. It was just too cool to not covet, and I revisited the booth where it was being demonstrated at least three times to check it out.
My only reservation concerned the weight of the unit with the Canon XL1 mounted. I mean, I'm a pretty big guy, although no body builder, and after about five minutes of holding it I felt like I was back in the gym. The demonstrator, Geno Durante of Steadi Systems saved the day however, when he promised there would soon be a vest and support arm available.
Consequently, when my accountant told me I could buy a few items of equipment at the end of the year to avoid sending extra dollars to the IRS, I ordered the DV Steadicam, the vest with arm, the soft case, and an extra battery. I later purchased the special display stand from Cinema Products, which provides a very convenient method for "parking" the Steadicam rig and camera when it is not attached to you.
I received the Steadicam DV by overnight delivery, but because I needed to special order the vest to fit, (again, I am not small), it took almost an extra month before I received it. At the current time, an unscientific survey of major suppliers reveals that both the Steadicam DV and the vest seem to be in the supply channels. Incidentally, according to a company spokesperson, this is the same vest that is sold with the $9,000 version of the Steadicam.
Now for a few critical observations, and hopefully helpful hints on the product.
First, resign yourself to the fact that you are not going to get the unit to work right out of the box, because there is some learned skill involved, and the "Quick Balance Instructions" are not very quick. Personally, I became so agitated that I called Cinema Products Sales Manager Gary Galvin, who was very helpful and patient on the phone. Unfortunately, when I followed his instructions, I still couldn't get it to balance. It was then that I made my way into Cinema Products headquarters in Los Angeles, mumbling something under my breath to the effect that if they didn't get the thing to work, they could jolly well give me my money back.
Naturally, I walked in and the Steadicam DV product manager, Kyle Young, unpacked my camera and Steadicam, put them together, and balanced them immediately. Here's what I learned:
Follow only the guidelines printed on the "Quick Balance Instructions" for the Canon XL1 (a single sheet). Do not pay attention to the balancing information contained in the book that comes with the unit. It will just confuse matters.
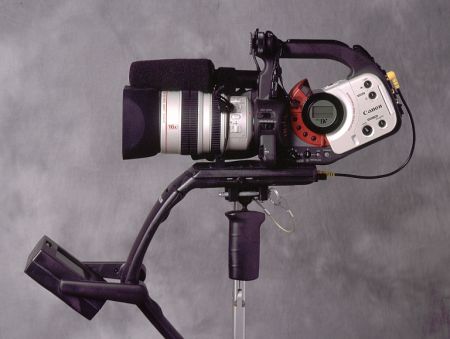
Follow the step-by-step instructions precisely. Use two weight plates on the battery compartment. Make sure the shortest gimbal extension is well threaded into its socket. Remove the viewfinder entirely and relocate the microphone to the right handle (more about this later). Use hole #19 for attaching the camera tripod socket to the dovetail plate and #3 for the lens support. If you strip the threads while trying to install the locating pin in its hole, don't worry about it. The pin isn't essential, but if its absence bothers you, a small nut to hold it in place is available from any hardware store.
The instructions are somewhat imprecise when they say to wrap the lens support strap tightly. I mean, when they say tightly, they mean tight. Looking back on the whole thing, I believe a big part of my problem was that I was afraid to tighten this strap and the camera did not stay straight on the dovetail plate, throwing the whole thing off balance. When you tighten these elastic straps, about four inches of each end needs to be sticking out of the little clamp which holds them.
When you go to align the dovetail plate to balance the camera, sit down in a chair at a table where you can support the elbow of the arm holding the Steadicam while you make adjustments with your other hand. Be sure to have a battery and tape in the camera. To start, know that the side-to-side adjustment will be such that the camera is nearly all the way to the left of its travel. After getting this, the front-to-back balance is pretty simple to achieve. A helpful fact to keep in mind is that you are not simply adjusting the plate in two directions; by moving both screws, you can also move it diagonally. Incidentally, there is some good news here; once you have adjusted the unit once, you will probably have to make only minor corrections in the future.
When operating the Steadicam, the viewer unit's bracket must be all the way down. Set the zoom on maximum wide angle and manual focus on infinity. If you have the Canon XL1's wide angle lens, so much the better. Use it.
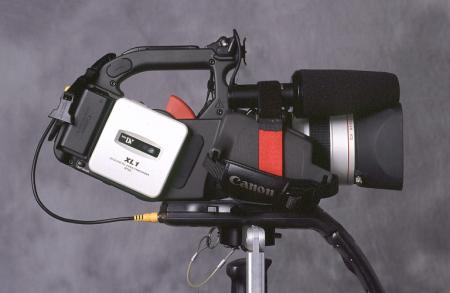
Now, about relocation of the microphone. Since I have been studying the subject, I have noticed three methods for attaching the mike. One is double sided Velcro tape wrapped around the right front handle and the microphone. I tried this method and couldn't get the mike to point in the same direction as the lens. Besides, it seemed, well, less than professional. Then, in Jim Farrell's "Steadicam Advanced Operation" video tape, (for a copy call 1-800-340-4775), I noticed that Jim seems to be using Sticky Back Velcro, although I'm not sure how. I also tried this, and it didn't work at all for me. Seeing the necessity to become creative, I then bought a Velcro "Cinch Strap" at my local hardware store, used a sewing machine to modify its length to fit the handle and mike, and arrived at a solution that more or less satisfies me, at least temporarily. It still tends to be unstable, however, and you may need to use a small piece of sticky back Velcro on the back of the mic to keep it on the camera.
The one thing that bothers me about all of these microphone attachment methods is the ease with which motor noise could potentially be transmitted to the audio tracks. Consequently, I am working on a method for attaching an additional hot shoe to the right side of the camera and using a lightweight Sennheiser MKE-300 microphone.
Conclusions? When mounted on the support arm of its optional vest, the Steadicam DV will increase your ability to communicate by adding some really great shots to your repertoire. Through this whole experience, I have learned two important lessons. First, if you are going to buy the Steadicam DV for use with the XL1, get the vest. Otherwise its potential will be greatly reduced. (If you want to use the unit hand held only, consider the Sony DCR-VX1000.) Second, do not expect to start using the unit right out of the box. Like any other professional tool, it becomes truly powerful only when its use is transparent, and that will take many hours of practice, planning, and experience.
The Watchdog notes: Jim Treganza operates out of his project studio in Visalia, California, and now uses the Canon XL1 almost exclusively. In addition to creating marketing videos and documentaries, he teaches video production classes for educators through Fresno State University. He grew up in the San Francisco Bay Area and is a graduate of San Francisco State University's Broadcast and Electronic Communications Arts program.
Back to the XL1 Articles Menu
Thrown together by Chris Hurd
Please direct questions to the DV Info Net Community Forums.
Where to Buy: These dealers are authorized DV Info Net sponsors... | |||
|
|
|
|
|
|
|
|
Please support this site by making your purchases through them. Thanks! | |||
©1998-2008 DV Info Net
The Digital Video Information Network
San Marcos, Texas
Dreams are what get you started. Discipline is what keeps you going.